If you’ve been scrolling through social media and seeing absolutely stunning AI-generated artwork, there’s a solid chance it came from Midjourney. What was sci-fi just a few years ago—asking a computer to create finished digital art based on your description—is now something you can do in minutes. And honestly, once you understand how to use it properly, the results can be genuinely impressive.
But here’s the thing: most people jump in, type something vague, and then wonder why their results don’t look like the portfolio pieces they admired. The difference isn’t luck or some secret setting. It’s all about how you write your prompts and which parameters you’re using. Let me walk you through everything you need to know.
Getting Started with Midjourney
Before you can create anything, you need to get set up. Midjourney doesn’t have its own interface—it runs through Discord. So first, head over to Discord and create an account if you don’t have one already. Then visit Midjourney’s official website and click “Sign in with Discord” to link your account.
Once you’re in, you’ll join their public servers or create a private server to generate your images. The workflow is straightforward: you type a command, Midjourney processes it, and within about a minute, you get four image variations based on your description. From there, you can upscale the ones you like, create variations, or remix and iterate.
Now, about pricing. Midjourney operates on a subscription model with three main tiers. The Basic plan is $10 per month and gives you a limited number of GPU minutes—perfect if you’re just experimenting. The Standard plan ($30/mo) gets you fast processing and more GPU minutes, which is what most content creators land on. If you’re running a professional design business or generating images constantly, the Pro plan at $60/mo gives you unlimited fast generations and priority processing. There’s also an Annual option that saves you about 20 percent if you commit for a year.
Mastering Prompt Engineering
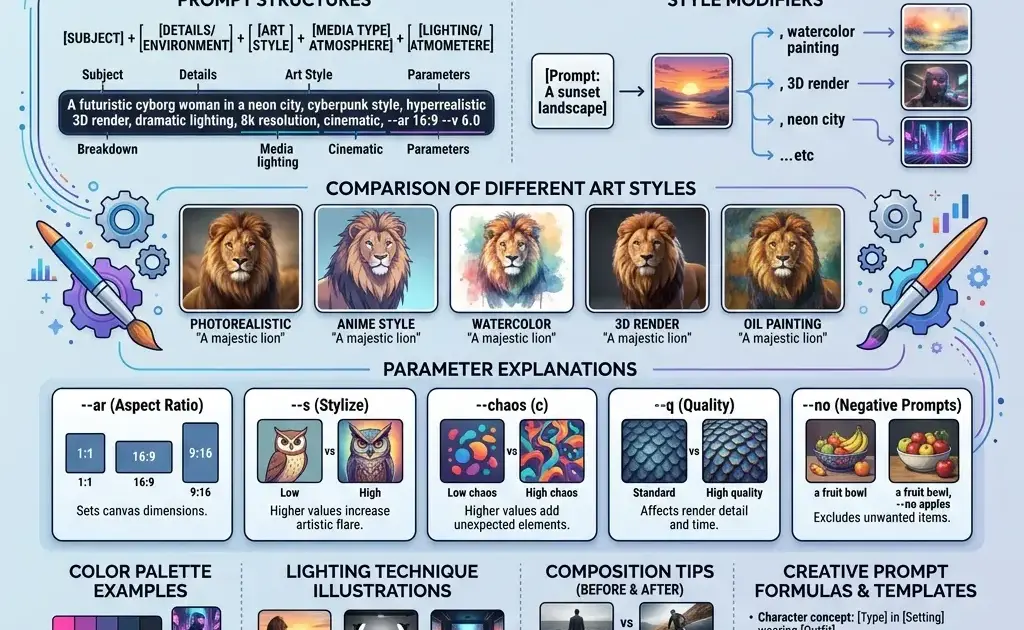
This is where the magic happens. Your prompt is essentially your art direction, and the better you communicate what you want, the better your results. Most beginners make prompts way too short. Something like “a cat” is going to give you something technically correct but uninspiring. You need specificity.
Think about what you’re actually trying to create. Are you going for a fantasy illustration? A photorealistic product shot? A stylized character design? Your prompt should paint a picture with words. Start with your main subject, then layer in descriptive details about mood, style, lighting, and composition. Something like “a wise elderly wizard with a silver beard, holding an ancient staff glowing with ethereal blue magic, standing in a misty forest at dusk, painted in the style of concept art, dramatic lighting, volumetric fog” is going to get you somewhere way more interesting than “wizard.”
The key is being descriptive without being overwhelming. You want enough detail to guide Midjourney toward your vision, but if you write something so long and complicated that it’s hard to parse, the AI will struggle. Aim for a paragraph or two—usually 50 to 150 words is the sweet spot.
One pro tip: think about the medium or style you want. Adding references like “oil painting,” “digital art,” “photography,” “3D render,” or “animation” can dramatically shift the output. You can also reference specific artists or art movements. Something like “in the style of concept art” or “inspired by anime” will give you recognizable aesthetics.
Styling Parameters That Actually Matter
Beyond your text description, Midjourney has several parameters you can add to fine-tune your results. These go at the end of your prompt and start with a double dash (–). Let’s talk about the ones that make a real difference.
The aspect ratio parameter (–ar) controls whether your image is wide, square, or tall. Default is square, but you can specify 16:9 for wide landscapes or 9:16 for vertical mobile-friendly compositions. This matters more than you’d think for how your final image feels.
The quality parameter (–q) affects how much computational power Midjourney uses on your image. Values range from 0.25 to 2, with 1 as default. Bumping it to 2 gives you crisper, more detailed results but uses twice the GPU minutes. For most work, the default or 1.5 is solid.
Style quality (–s) is wild. It controls how much the image adheres to your style descriptors. Lower values (around 50-100) give you more variation and unpredictability; higher values (750+) push the AI harder to follow your exact style specifications. Experiment with this one—it’s where a lot of “that’s not what I wanted” moments come from, but it’s also where you can really dial in exactly what you’re after.
Then there’s the chaos parameter (–c), which controls randomness. Low chaos (0-20) gives you consistent, predictable results; high chaos (80-100) throws more variation at the wall. For a client project, you probably want low chaos. For exploration and getting surprising results, crank it up.
One more that’s underrated: the seed parameter (–seed). When you include a seed, Midjourney remembers the “random” starting point. Use the same seed with slightly different prompts to maintain visual consistency across a series. That’s powerful when you’re building a cohesive art style or series.
Advanced Settings for Better Results
Once you’ve got the basics down, there are some more advanced moves that separate the pros from the people just clicking around. The niji model (–niji) is specifically trained on anime and illustration styles, so if that’s your lane, it’s worth exploring. The quality can be different than the standard model—sometimes better, sometimes just different. Test it out.
Weighting is huge if you want to emphasize certain parts of your prompt. You can use ::1 to give certain elements more weight, like “a cyberpunk city::2 with neon lights::1” to make sure the city is the star and the lights are secondary. It takes practice to get right, but it’s incredibly useful.
The pan and zoom parameters (–pan and –zoom) let you extend your compositions beyond the original frame or zoom in on details. This is brilliant when you’ve got something you like but want to see more of it or focus on a specific part.
Describe mode (–describe) works in reverse—you upload an image, and Midjourney tells you what prompt would create something similar. This is perfect for studying how other artists are crafting their prompts or for getting inspiration from existing work.
Before and After: Real Examples of Prompt Refinement
Let’s look at how iteration actually works. Imagine your first prompt: “a dragon.” You hit enter, get four dragons, and one of them isn’t terrible—but it’s generic. Maybe it’s missing the epic scale you wanted, or the texture isn’t quite there.
Second iteration: “an ancient red dragon with weathered scales, perched on top of a mountain fortress at sunset, dramatic lighting casting long shadows, fantasy illustration style, high detail, 8k quality.” Now you’re getting somewhere. Same subject, but you’ve given context and style direction.
But maybe the color is off or the scales aren’t detailed enough. Third iteration: “an ancient crimson dragon with intricate scaled armor, massive wings folded, standing on a weathered stone fortress overlooking a valley at golden hour, painted in the style of fantasy concept art, volumetric lighting, extremely detailed scales, –ar 16:9 –s 850 –q 2.” Now you’re really cooking. You’ve specified color, added composition details, locked in the style, and used parameters to push the quality.
That’s the real workflow. Rarely does anyone nail it on the first try. The best artists are the ones who iterate, tweak, and learn what works. Save your prompts. Notice what parameters moved the needle for you. Build a personal style guide of prompts and settings that consistently work.
Practical Tips for Better Output
Here’s a bunch of smaller tips that’ll level up your game. First, be specific about lighting. “Cinematic lighting,” “golden hour,” “harsh studio lights,” “bioluminescent glow”—these descriptions completely transform your results. Lighting is everything in visual art, and Midjourney responds well to clear lighting direction.
Second, reference quality is your friend. Instead of describing everything, if you can name a photographer or painter whose style you want, drop their name. “In the style of Ansel Adams” or “inspired by Rembrandt” gives Midjourney a shorthand for complex aesthetic choices.
Third, negative prompts can help too. Using –no followed by what you don’t want (like “–no blur, artifacts, low quality”) can prevent common issues. It’s not perfect, but it helps.
Fourth, use the upscale (U) and variation (V) buttons strategically. Don’t just blindly upscale everything. Look at the grid, pick the best one, and decide if you want more of the same thing (U) or variations on that theme (V). This is where real iteration happens.
Fifth, join the Midjourney community. Thousands of people are sharing prompts and results. Studying what other creators are doing—their prompt structure, their parameter choices—is gold. You’ll pick up patterns and techniques way faster than trial and error.
The Reality Check
Look, AI art tools are incredible, but they’re not magic. You still need taste, direction, and the ability to know when something is actually good versus just novel. The best digital artists using Midjourney aren’t just feeding random prompts into the system—they’re treating it like a collaborator, refining iteratively, and understanding the tool deeply enough to know what it’ll do before they hit enter.
Some images still come out weird. Sometimes the hands are wrong (this happens less than it used to, but it still happens). Sometimes the composition doesn’t quite land. That’s when you iterate, adjust your prompt, try different parameters, or start fresh with a new approach.
But when you nail it? When you hit that prompt and the image that appears perfectly matches what was in your head? That’s genuinely satisfying. And it’s totally achievable once you understand the mechanics.
If you’re serious about exploring Midjourney, commit to actually learning it. Spend time experimenting with different prompts and parameters. Join their community. Save the prompts that work. Build your skills intentionally. That’s how you go from making random AI art to creating genuinely impressive digital work that looks like it came from a real artist. Because in a way, it did—you just got an AI to interpret your artistic vision.